CRYOGENIC DEWAR MAINTENANCE
[sws_button class=”” size=”sws_btn_small” align=”sws_btn_align_left” href=”http://tristantech.com/wp-content/uploads/2013/10/Dewar_maintenance_v2.pdf” target=”_blank” label=”Download the PDF” template=”sws_btn_midnightblue” textcolor=”000000″ fontweight=”normal” bgcolor=”” bgcolorhover=”” glow=”sws_btn_glow” btnwidth=”” textalign=”center”] [/sws_button]
LIQUID HELIUM DEWAR VACUUM
Because there is some diffusion of helium through warm fiberglass, helium gas should not be allowed to remain in a warm dewar for extended periods. There is also a small amount of helium diffusion that occurs during normal operation through the warm, upper portion of the neck tube. Large quantities of air, water, and other gasses are also outgassed from the warm, interior surfaces of the dewar vacuum space. However, there is a molecular sieve getter in the vacuum space which absorbs large amounts of gas when the dewar is cold. Therefore, the vacuum space should not require any maintenance for over a year of normal operation.
Eventually, the vacuum space of the dewar will need to be re-evacuated. This will become obvious in one of two ways:
- The helium evaporation rate will increase during normal operation. If the evaporation rate has increased by more than 30%, you should consider re-pumping the vacuum space. n.b., if you have an adjustable tail dewar, be sure that the excessive boil-off is not due to extremely close spacing of the dewar tail. See your manual for details.
- You will be unable to transfer liquid helium. All of the helium transferred into the dewar will immediately evaporate. If the vacuum is extremely poor, the outside of the dewar may get cold and even condense water (“sweat”), especially along any tail section with especially close spacing between the cryogenic region and the exterior of the dewar.
If you suspect a poor vacuum, use the following procedure to check and pump on the vacuum:

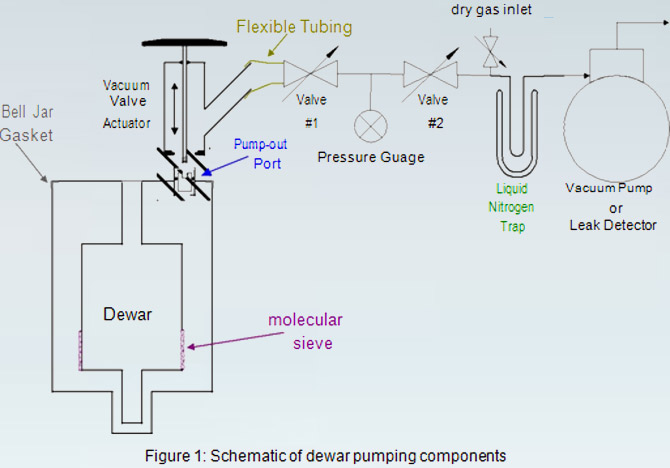
You will need a valve actuator, a turbomolecular vacuum pump or dual-stage rotary pump with a cold trap, a thermocouple pressure gauge with millitorr sensitivity, two valves and connecting hoses or tubing. Connect the components as shown in Figure 1.
If the vacuum space of the dewar may be at atmospheric pressure and the dewar uses bell jar gaskets or o-rings to keep the outer case together:
- Be sure that you don’t lift the dewar by the top plate. If there is no vacuum or partial vacuum in the vacuum space, the bottom section of the dewar will fall off.
- Inspect the bell jar gaskets or o-rings to be sure they are clean and properly located. If they need to be replaced, be sure that the replacements are lightly coated with silicone vacuum grease.
- In situations where the top plate is just sitting on the dewar body, gravity alone may not be sufficient to form a good vacuum seal between the bell jar gasket or o-ring and the dewar pieces. Be sure that the dewar top plate is securely attached to the dewar body. Only then should you start the pump-out process.
The dewar is equipped with a vacuum space evacuation valve mounted on the dewar top. Before opening this valve, a leak-tight connection should be made to it and the pumping line to the valve should be evacuated using a turbomolecular pump or dual-stage rotary pump equipped with a cold trap. The pump should be capable of achieving an ultimate vacuum below 5 millitorr and have a pumping speed of ½ CFM or larger. This should be sufficient to pump down most dewars.
If the pump is not oil free, then a liquid nitrogen trap is required. The cold trap is necessary to prevent back-streaming of pump oil into the vacuum space after it has reached a low, static pressure.
-
- Make sure all the components in Figure 1 are connected and leak tight. Valves #1 and #2 should be closed.
- Connect the vacuum valve actuator onto the pump-out port on the dewar. Be sure that the o-ring that will surround the pump-out port has seated.
- Lower the actuator piston until it touches the pump-out port plug, which has a threaded insert in it.
- Screw in the actuator piston into the pump-out port plug. Only screw it in a couple of turns. If you screw in the piston all the way, it may get stuck and it will be nearly impossible to disengage the pump-out port plug and remove the vacuum valve actuator assembly after you have completed pumping out the dewar. DO NOT RAISE THE PISTON YET
-
- Turn on the vacuum pump and open valve #2. Monitor the pressure gauge.
- When the pressure has reached a minimum, note the value.
- Close valve #2 and open Valve #1. Now raise the valve actuator piston.
-
- If you observe a high pressure (more than a few Torr), you should pump the vacuum space very slowly by opening valve #2 as little as possible.
- When the pressure gauge reads a pressure of below 1000 milliTorr with both valves open, you may now fill the cold trap with LN2 if one is equipped.
- The actuator piston may begin to lower by itself due to the pressure differential on the valve. Putting a toothpick to prop up the top of the actuator piston handle can keep it from lowering.
- A satisfactory vacuum is about 50-100 milliTorr when the whole dewar is at room temperature. Small dewars will typically pump down below 100 milliTorr whereas a large MEG whole head dewar may only achieve 200 milliTorr. Depending on the pressure and volume, it may take up to 24 hours of pumping to obtain a satisfactory vacuum.
You can check for outgassing by closing valve #2 and seeing if the pressure rises. Usually, it will only take one or two minutes to determine the static pressure. If the static pressure is greater than desired, resume pumping.
If you are using a leak detector for your pump and if your leak detector indicates the presence of residual helium gas, it may be advantageous to flush the vacuum space once nitrogen gas. Slowly fill the vacuum space with ~10 Torr of nitrogen gas. This should not be done at a rate faster than 1 Torr per minute. It should then be re-evacuated as described above. This procedure may be repeated several times until the helium level is low. It is not necessary to pull a hard vacuum when flushing the dewar. It need only be pumped down to a few Torr if you are going to immediately flush it with nitrogen. If after repeated pumping, the static pressure seems to stay at a few Torr, it is possible that there is water in the vacuum space. Pumping on liquid water will cause it to freeze with a vapor pressure of ~5 Torr. Flushing the dewar vacuum with dry nitrogen gas will also help to purge the water vapor.
Once you have achieved a good vacuum in the dewar, close the valve by the following procedure:
- Test the static pressure as described above and write down its value. This may be useful in diagnosing potential problems in the future.
- Lower the vacuum valve actuator until the vacuum plug is seated in the pump-out port.
- Fully unscrew the actuator piston until it clicks and raise the actuator piston.
- Close off the vacuum valves (#1 & #2) and turn off the pump.
- Remove the valve actuator assembly while maintaining downward pressure on the piston.
If the dewar does not perform well after pumping the vacuum, or if it requires pumping at intervals more frequent than once a year, there may be a leak in the dewar. If you suspect this problem, contact your Tristan representative for assistance.
LIQUID NITROGEN DEWARS
Just as in liquid helium dewars, there is some diffusion of gas through warm fiberglass. While there is a getter in the vacuum space which absorbs large amounts of gas when the dewar is cold, it is nowhere as efficient as a getter cooled to liquid helium temperatures. It is not uncommon for a liquid nitrogen dewar to need pumping out on an annual basis. Eventually, like liquid helium dewars, the vacuum space of the dewar will need to be re-evacuated. This will become obvious in one of two ways:
- The nitrogen evaporation rate will increase during normal operation. If the evaporation rate has increased by more than 30%, you should consider re-pumping the vacuum space.
- While you may be able to transfer liquid nitrogen, the outside of the dewar may get cold and even condense water, especially along the tail, if any.
If you suspect a poor vacuum, use the same procedure as is used on liquid helium dewars to check and pump on the vacuum.
If you are still having problems, contact the manufacturer for advice.


